

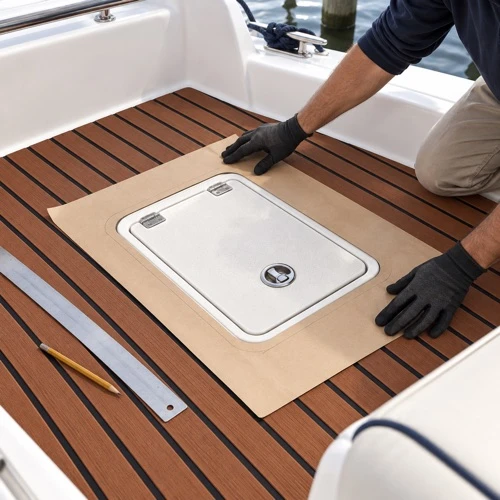
Boat Flooring Dry-Fit Checklist for Shipyards
A boat flooring dry fit is the last practical chance to catch fit problems before a shipyard commits to adhesive, closeout, or buyer acceptance. It is not a decorative pause in the schedule. It is a control gate where the yard checks whether templates, panels, hatches, hardware, seam lines, and approval notes still match the actual boat.
This checklist is written for shipyards managing EVA marine deck or boat flooring work as part of a new build, refit, or customer-requested deck upgrade. It does not replace the supplier's installation instructions. It gives the yard a practical way to decide what must be checked, photographed, corrected, or escalated before the job moves forward.
For broader installation planning, the XYF Marine article on EVA marine deck installation and QC is a useful companion. This page focuses specifically on the dry-fit moment.
Define What Dry Fit Means for This Project
The first mistake is using the phrase "dry fit" without defining the scope. For one project, it may mean placing paper templates on the deck before cutting. For another, it may mean laying CNC-cut panels on the boat before removing any liner. For a third, it may mean checking one high-risk zone before the rest of the kit is released.
Shipyards should record which version applies. The record can be simple: template dry fit, panel dry fit, partial-zone dry fit, or full-kit dry fit. This prevents a later argument about whether the yard actually confirmed the part fit or only reviewed a drawing.
The dry-fit scope should also identify who attends the check. A yard technician may confirm physical clearance. A project manager may approve appearance. A buyer or owner representative may need to approve visible layout. These roles should be clear before the flooring is handled.
Check the Current Boat Against the Approved Inputs
Dry fitting only works when the yard knows what the panels are supposed to match. Before placing anything on the deck, gather the active drawing, template set, part list, revision date, photos, and approval notes. If there are several file versions in circulation, stop and identify the current one.
This step is especially important after a change order, hardware update, or late owner preference change. A panel can be cut correctly against an old instruction and still be wrong for the boat that is now in front of the yard.
If the project still needs cleaner drawings or template discipline, link the dry-fit process back to the XYF Marine marine deck drawing and template guide. A dry fit cannot fully rescue an unclear drawing package; it can only expose the parts that need correction.
Verify Part Identity Before Placement
Do not start by placing random panels on the deck. First confirm part names, labels, top face, backing side, bow direction, port and starboard orientation, and any visible grain or groove direction. If a kit uses mirrored parts, check that the labels make sense before the parts are moved around.
This sounds basic, but it prevents many avoidable mistakes. A panel may appear close in shape when rotated, especially around simple steps or lids. If the wrong face or direction is used during dry fit, the team may approve a layout that cannot be installed correctly.
For CNC-cut work, part identity should match the part list and the active drawing. If the label system is unclear, document the issue before proceeding. A shipyard should not rely on memory when multiple installers, inspectors, or buyer representatives may review the same flooring kit.
Confirm Hatch Operation and Lid Clearance
Hatches are one of the highest-risk areas in boat flooring dry fit. A flooring piece may look acceptable when the hatch is closed, then rub, bind, lift, or interfere when the lid opens. The dry-fit check should include both closed and open positions wherever the flooring touches a hatch, lid, locker, livewell, or access panel.
Check the perimeter gap, handle clearance, hinge-side clearance, drain access, and whether the flooring edge sits where the user will naturally step or pull. Do not treat hatch fit as only a visual border. It is a functional check.
If a gap or clearance issue appears, take photos from above and from the operating angle. Mark whether the issue is a drawing problem, a cutting problem, a changed boat condition, or an installation decision. The XYF Marine CNC tolerance guide can help teams frame these fit-risk notes more clearly.
Review Hardware, Rails, Drains, and Other Fixed Features
Boat flooring rarely lives on an empty deck. Cleats, rails, seat bases, consoles, steps, rod holders, drains, brackets, and fasteners can all create conflicts. During dry fit, the yard should walk the whole target area and ask whether each feature needs a cutout, clearance gap, stop line, or installation note.
Pay attention to features that have been temporarily removed. If hardware will be reinstalled after flooring, confirm whether the panel needs a pre-marked opening or whether the installer will trim during installation. That decision should be written down because it changes responsibility.
Also check whether the flooring blocks drainage paths or access points. A surface can look clean in a photo while creating a service or maintenance problem later.
Inspect Seam Alignment and Visual Flow
Dry fit is also the point where the shipyard sees the deck as a full layout, not as separate pieces. Check whether seam spacing looks intentional, whether adjacent panels align, and whether texture or groove direction creates a consistent visual flow.
This is not about chasing perfection beyond the project scope. It is about catching obvious conflicts before adhesive or final approval. If the approved drawing called for a direction change at a step, record that it is intentional. If the direction change is accidental, pause and decide whether the part should be corrected.
For shipyard programs, small appearance choices can become repeat issues across several boats. A simple photo record from dry fit can protect the approved standard for future builds.
Decide What Counts as a Pass, Hold, or Change
A dry-fit checklist needs decision language. Otherwise every issue becomes a debate. Shipyards can use three simple outcomes: pass, hold, or change.
Pass means the part or zone is acceptable for the next step. Hold means installation should not continue until a question is answered. Change means the drawing, panel, template, scope, or buyer approval needs revision.
This matters because not every finding is a supplier defect. Some findings are owner preference changes. Some are boat-condition discoveries. Some are installation choices. When a dry-fit issue changes the original scope, the yard should connect it to a written change process. The XYF Marine marine deck change order control guide is useful for that handoff.
Photograph the Evidence Before Adhesive
Photos are not paperwork decoration. They are the shared memory of the dry-fit decision. Take overview photos of each zone, close photos of hatches and hardware, and detail photos of any part that needs correction or buyer confirmation.
The photos should show the part in place, not only a mark on the deck. If a paper template is being checked, include the template edge, the deck feature, and the note that explains what is being verified. If a panel is being checked, include the label or part identity when possible.
Avoid making unsupported claims from the photos. A dry-fit photo shows that a check was performed under visible conditions; it does not prove long-term performance, material certification, or final installation quality by itself.
Keep Dry Fit Separate From Final Handover
Dry fit and handover are connected, but they are not the same stage. Dry fit asks, "Can this proceed?" Handover asks, "Was this completed and accepted?" If the yard mixes the two, unresolved fit questions can be buried until the buyer sees the finished deck.
Before final closeout, make sure dry-fit holds are either resolved or clearly transferred into the final project record. The XYF Marine marine deck handover checklist for shipyards can support that final documentation step.
This separation gives the project team a cleaner trail: approved inputs, dry-fit findings, corrections, installation decisions, and final acceptance.
Shipyard Dry-Fit Checklist
Use this short checklist before adhesive or final installation:
- Active drawing, template set, part list, and revision date are identified.
- Dry-fit scope is defined as template, panel, partial-zone, or full-kit check.
- Part labels, top face, backing side, bow direction, and port/starboard orientation are confirmed.
- Hatches and lids are checked in closed and open positions.
- Hardware, rails, drains, fasteners, and access points are reviewed.
- Seam alignment, groove direction, and visible layout flow are photographed.
- Any issue is marked as pass, hold, or change.
- Buyer, yard, or supplier follow-up responsibility is recorded.
- Photos are saved before adhesive or final installation begins.
The checklist should be adjusted to the project. A simple material sale may not need a full shipyard record. A custom kit, high-visibility customer boat, or repeated production model deserves more discipline.
FAQ
When should a shipyard dry fit boat flooring?
Dry fit should happen after the active drawing, template, or panel set is available and before adhesive, liner removal, final trimming, or buyer acceptance. For high-risk zones, a template dry fit may happen before cutting.
Is dry fit only needed for CNC-cut boat flooring kits?
No. CNC-cut kits need careful dry fit, but template-based projects, hand-trimmed panels, and partial refits can also benefit from a dry-fit check around hatches, hardware, seams, and visible direction.
What should be documented during dry fit?
Document the active revision, checked zones, part identity, hatch operation, hardware conflicts, seam alignment, pattern direction, pass or hold decisions, and photos of any issue that needs correction or approval.
Work With XYF Marine on Shipyard Flooring Projects
When discussing boat flooring dry-fit questions with XYF Marine, send the active drawing or template notes, photos of the target deck zones, hatch and hardware concerns, part labels if available, and a clear note on what the yard needs to confirm before installation. Clear dry-fit evidence helps turn a late installation question into a practical project decision before the work moves too far forward.