


EVA Marine Deck Installation Guide: Surface Preparation and QC for B2B Projects
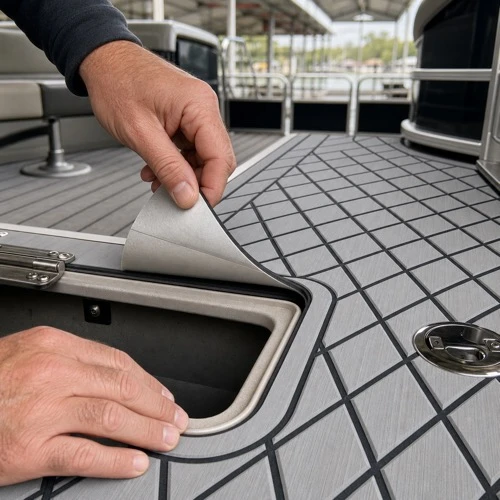
EVA Marine Deck is often judged by its color, texture, thickness, and pattern, but the final customer usually experiences it through installation quality. A well-made deck kit can still create complaints if the surface is dirty, the adhesive is handled poorly, the installer rushes alignment, or the project has no clear acceptance standard.
For boat builders, marine distributors, repair yards, dealers, CNC shops, and OEM buyers, installation should be treated as part of the product specification. This guide explains how to plan surface preparation, adhesive-backed installation, kit inspection, and quality control before scaling an EVA foam boat flooring program.
Why Installation Planning Matters
Marine deck installation is not only a workshop task. It affects warranty risk, dealer satisfaction, repeat orders, and the perceived quality of the boat. When a customer sees lifting edges, trapped bubbles, crooked seams, adhesive marks, or poor alignment around hatches, the first reaction is often to blame the flooring material. In many cases, the real cause is poor preparation or unclear installation control.
B2B buyers should define installation requirements before bulk ordering. A distributor that sells loose sheets may need simple installation instructions. A boat builder using CNC-cut kits may need drawing control, part numbering, dry-fit checks, and batch inspection. A repair yard may need guidance for removing old carpet, cleaning adhesive residue, and preparing aged fiberglass.
Good installation planning helps prevent avoidable claims and makes the product easier to sell through dealers or service teams.
Start With the Boat Surface
The adhesive backing on EVA Marine Deck needs a clean and stable surface. The best material will not bond correctly to oil, wax, dust, moisture, old glue, loose paint, silicone residue, or poorly repaired fiberglass. Before installation, the surface should be inspected carefully.
B2B project teams should confirm:
- The original surface material, such as fiberglass, aluminum, painted deck, or coated panel
- Whether old carpet, rubber, vinyl, or glue must be removed
- Whether the surface is flat, curved, textured, repaired, or damaged
- Whether moisture is present around hatches, screw holes, seams, or drains
- Whether any wax, polish, oil, sunscreen, or cleaning chemical remains
- Whether the temperature is suitable for adhesive installation
This information should be shared with the supplier before sample approval. Surface type can affect adhesive choice, installation instructions, edge planning, and the expected warranty language.
Clean, Dry, and Stable Is the Baseline
Most installation failures begin with weak surface preparation. The deck should be clean, dry, and stable before the release liner is removed. If old adhesive remains, it should be removed according to the boat surface condition. If the surface is rough or damaged, it may need repair before flooring is applied.
Installers should avoid applying EVA foam boat flooring immediately after washing if moisture may remain in seams, hatches, or screw holes. They should also avoid installation on a surface that has just been polished or treated with products that reduce adhesion.
For dealer programs, a simple preparation checklist should be packed with every kit. The checklist should be written for real installers, not only engineers. It should explain what to clean, what to avoid, and when to stop the installation if the surface is not ready.
Dry Fit Before Removing the Liner
For CNC-cut custom boat deck kits, dry fitting is one of the most important QC steps. Every part should be placed on the boat before the adhesive liner is removed. This helps confirm orientation, part number, seam spacing, hatch clearance, hardware clearance, and edge alignment.
Dry fitting is especially important around:
- Hatches and locker lids
- Hinges, latches, drains, and screw heads
- Curved corners and tight radiuses
- Steps, swim platforms, and cockpit edges
- Multi-piece seams and centerline layouts
- Areas where water needs to drain freely
If a kit is misaligned during dry fit, the installer can still adjust the plan. If the adhesive liner has already been removed, correction becomes slower, messier, and more expensive.
Adhesive Handling and Release Liner Control
Adhesive-backed Marine Deck should be installed with controlled pressure and alignment. Installers should peel the release liner gradually instead of removing the full liner at once. This reduces the risk of the sheet touching the surface before it is positioned correctly.
For large panels, two installers may be better than one. One person can control alignment while the other removes the liner and applies pressure. A roller or firm hand pressure can help improve contact, especially around edges and corners. After installation, the deck should be allowed to bond before heavy traffic or water exposure, according to the adhesive guidance.
Buyers should ask the supplier for recommended installation temperature, curing time, storage conditions, and surface preparation notes. These details should be included in distributor instructions, dealer training, and OEM assembly documents.
Edge Planning Reduces Future Complaints
Edges are usually where installation problems appear first. If an edge is placed across a high-wear traffic path, over a wet recess, near a sharp corner, or beside a poorly cleaned area, it may lift earlier than the center of the panel. This is why drawing review and kit layout matter.
For OEM and repair projects, review edge locations before cutting:
- Avoid unnecessary sharp points where possible
- Use realistic corner radiuses for CNC-cut parts
- Keep seams away from heavy foot traffic when practical
- Leave clearance around moving lids and hardware
- Do not block drainage paths
- Consider extra attention around swim platforms and entry points
Good edge planning does not make installation complicated. It makes the finished deck more durable and easier to defend if a customer later asks why a layout was chosen.
Inspection Before Packing and Shipment
Installation quality starts before the product reaches the boat. For custom marine flooring orders, the supplier and buyer should agree on pre-shipment checks. This is especially important for private-label programs, repeat OEM models, and distributor inventory.
Inspection should include:
- Color and texture compared with the approved sample
- Thickness, density, and surface finish
- Adhesive backing condition
- CNC cutting accuracy and part numbering
- Groove depth and bevel consistency
- Surface cleanliness before packing
- Carton labels, kit labels, and drawing references
- Protection against bending, pressure marks, and moisture during export
If the order includes multiple boat models, each kit should be clearly labeled so dealers or assembly teams do not mix parts during installation.
Installer QC During the Job
Dealers and repair yards should use a simple acceptance process during installation. This does not need to be complicated, but it should be consistent. A written checklist helps different installers produce the same standard.
A practical installer QC checklist includes:
- Confirm the boat surface is clean and dry
- Confirm the kit matches the boat model or drawing revision
- Dry fit every part before peeling the liner
- Check alignment around hatches and hardware
- Apply pressure evenly from center to edge
- Check for bubbles, wrinkles, or trapped dirt
- Confirm edges are fully pressed down
- Clean the surface after installation
- Photograph the finished deck for records
- Record any surface issue that existed before installation
For OEM production, these photos and records can support internal quality control. For distributors, they can help resolve claims and separate material issues from installation mistakes.
Common Installation Mistakes to Avoid
Many problems are predictable. B2B buyers can reduce claims by warning installers about the most common mistakes.
Avoid these issues:
- Installing over wax, oil, dust, moisture, or old glue
- Removing the full release liner too early
- Stretching the material during alignment
- Ignoring dry-fit problems
- Pressing only the center and neglecting edges
- Installing in unsuitable temperature conditions
- Covering drains or creating water traps
- Using strong solvents that damage the surface
- Allowing heavy traffic or washing too soon after installation
These mistakes are easier to prevent than to repair. If a buyer plans to resell kits through dealers, the installation guide should be part of the sales package.
How B2B Buyers Should Write Installation Requirements
Instead of treating installation as an afterthought, include it in the purchase specification. A clear specification helps the supplier design the right product and helps the buyer control quality in the field.
Useful requirements include:
- Boat type and installation area
- Surface material and condition
- Sheet, roll, or CNC-cut kit format
- Adhesive backing requirement
- Installation temperature and curing guidance
- Cleaning and surface preparation steps
- Drawing version and part numbering rules
- Dry-fit and acceptance checklist
- Packing and kit labeling requirements
- Dealer or end-user instruction format
For repeat OEM programs, keep one approved sample kit, one approved drawing set, and one installation checklist. These documents make future orders easier to repeat and easier to audit.
Why Work With XYF Marine
XYF Marine supplies EVA Marine Deck materials and custom boat flooring solutions for B2B buyers, including boat builders, marine distributors, repair yards, marine retailers, CNC shops, and OEM programs. We can support adhesive-backed sheets, color and texture selection, CNC-cut deck kits, sample review, packing, and export coordination.
If you are planning an EVA foam boat flooring project, contact XYF Marine to discuss your boat surface, installation method, kit drawings, sample requirements, and quality control needs.
FAQ
Why does adhesive-backed EVA Marine Deck lift after installation?
Common causes include dust, wax, oil, moisture, old glue, low temperature, weak pressure around edges, rushed curing, or installation over an unstable surface.
Should installers dry fit CNC-cut boat deck kits first?
Yes. Dry fitting helps confirm orientation, part numbering, seam spacing, hatch clearance, hardware clearance, and edge alignment before the adhesive liner is removed.
Can EVA foam boat flooring be installed over old carpet glue?
Old glue should usually be removed or properly prepared before installation. The correct method depends on the boat surface, adhesive residue, and repair condition.
What should B2B buyers ask before ordering custom boat deck kits?
Ask about material structure, adhesive backing, thickness, texture, drawing requirements, CNC tolerance, sample approval, packing labels, installation guidance, and QC records.