

Boat Flooring Adhesive Liner Handling Guide for Ship-Repair Yards
Ship-repair yards often treat the adhesive release liner as a small detail, but it controls one of the most important moments in a boat flooring job. Until the liner is removed, the panel can still be checked, staged, repositioned, and discussed. Once it is peeled, the work becomes time-sensitive and mistakes are harder to correct.
This guide is for repair-yard teams handling boat flooring adhesive liner workflows when self-adhesive backing is part of the approved scope. It does not replace the flooring supplier's installation instructions, adhesive data, or the yard's own method statement. It gives project managers, technicians, and receiving teams a practical checklist for staging panels, protecting the adhesive side, timing liner removal, and keeping useful records before final placement.
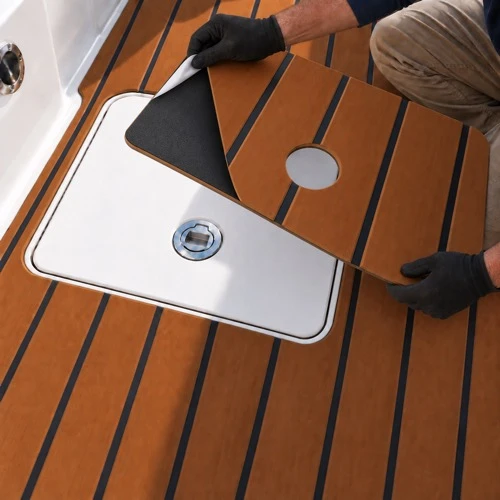
Why Release-Liner Handling Deserves Its Own Checklist
Adhesive-backed boat flooring creates a simple visual promise: peel, place, and press. Real repair-yard work is more complicated. Panels move between storage, dry-fit, trimming, hatch checks, tool carts, and sometimes more than one technician. A liner can pick up dust, fold back too early, drag across a deck, or be peeled before the team has confirmed the panel direction.
The result is not always an obvious failure on installation day. The problem may show up later as a lifted corner, a trapped particle, a misaligned seam, or a dispute over whether the deck was ready. A release-liner checklist helps the yard slow down at the exact point where rushed work creates avoidable rework.
Confirm the Scope Before Handling Panels
Before the team touches the liner, confirm whether the order actually uses self-adhesive backing, loose-lay material, separate adhesive, or a mixed scope. Do not assume every sheet or cut piece in the job is handled the same way. A mixed repair order might include replacement panels, hatch pieces, sample pieces, and trim-offs that need different handling.
Match each panel to the job record. Check the panel name, location, pattern direction, color reference, hatch or hardware note, and any revision mark. If the panel is still only identified by memory or by a loose photo in a chat thread, the liner should stay on while the record is cleaned up. Removing the liner before identity is confirmed turns an administrative gap into an installation risk.
Stage the Work Area First
Release-liner handling should happen in a staged work area, not in the middle of a cluttered deck. The team should clear loose dust, scraps, old adhesive residue, liquid containers, and unnecessary tools from the area where the panel will be turned, aligned, and placed. The floor or deck surface used for staging should not transfer grit to the exposed adhesive.
Set up clean gloves, soft weights if the yard uses them, alignment references, trimming tools, waste bags for liner scraps, and a place to put removed backing paper. If multiple panels are being installed, decide the sequence before peeling anything. The simple rule is: no liner removal until the panel has somewhere clean to go.
Dry-Fit Before Any Peel Step
A dry-fit is the best point to catch problems because the adhesive side is still protected. Place the panel in its intended location with the liner intact. Check edges, hatch openings, drain clearance, hardware cutouts, seam direction, pattern alignment, and whether the panel conflicts with hinges, latches, fasteners, molded curves, or raised fittings.
For larger jobs, use a sign-off point before liner removal. The sign-off does not need to be ceremonial. It can be a photo record, a supervisor note, or a simple checklist mark that says the piece was checked in position with the liner still on. This is especially useful when one person dry-fits the panel and another person performs final placement.
If a cutout, edge, or direction looks wrong, stop before peeling. A panel that needs trimming is far easier to manage while the adhesive remains covered.
Peel Only When Placement Is Ready
The liner should be removed as close to final placement as practical. Peeling early increases the chance of contamination, folding, accidental contact, and panic placement. For small panels, the team may remove the liner in one controlled step. For larger or awkward pieces, a staged peel may be safer: expose a starting edge, align the panel, then continue removing the liner while the panel is laid down.
Whatever method the yard uses, the team should avoid letting the exposed adhesive side touch clothing, old carpet fibers, sawdust, masking tape, cardboard, or unclean deck areas. If the panel must be lifted after partial contact, do it carefully and within the supplier's recommended method. Do not improvise with solvents, heat, or aggressive pulling unless the product guidance supports it.
Control Hands, Tools, and Waste
Adhesive handling is also a housekeeping task. Gloves should be clean enough that they do not transfer dust or oil to the adhesive face. Knives, scrapers, pencils, and other tools should not rest on exposed adhesive. Removed liner pieces should go directly into a waste bag or designated area so they do not blow back onto the deck or stick under another panel.
Technicians should avoid stepping over exposed adhesive or dragging hoses, cords, and air lines across the work zone. If the boat is outdoors, watch wind and airborne dust. If the boat is in a shared yard bay, keep unrelated grinding, sanding, or cleaning work away from the placement step.
Watch Hatch and Hardware Areas
Hatches, drains, hinges, and hardware openings are where liner handling often becomes awkward. A panel may look easy to peel on a flat bench but behave differently when it must fit around a circular opening, a hatch lip, or a narrow bridge between two cutouts.
Before peeling, decide how the panel will be supported around those openings. Check whether the piece needs two technicians so it does not fold onto itself. Confirm the pattern direction and seam alignment one more time before the first adhesive edge touches the deck. For hatch lids, make sure the panel is not pressed into final position until the opening, border, and hardware clearance have been checked.
Keep Product Evidence Practical
The best records are simple and factual. For each adhesive-backed boat flooring job, keep photos of the dry-fit with liner intact, any substrate concern that was raised before placement, the first placement point if it matters, and the finished panel after pressure or final smoothing. If a panel was revised, replaced, or trimmed, note that before the liner is removed.
Avoid turning installation notes into unsupported product promises. A photo of liner handling shows a workflow moment; it does not prove a test result, certification, warranty outcome, or long-term performance. Keep claim language separate from job records unless the buyer requested and received a specific supporting document.
Common Stop Signals
Pause liner removal when any of these signals appear:
- The panel location or revision mark is unclear.
- The substrate has visible residue, moisture, dust, soft spots, or old adhesive concerns.
- The dry-fit shows hatch, drain, edge, or hardware conflict.
- The technician cannot place the panel without folding it or touching the adhesive to a dirty surface.
- Wind, sanding dust, cleaning spray, or other yard activity is entering the work zone.
- The buyer or supervisor has not approved a visible color, direction, or seam decision.
Stopping at this point can feel slow, but it is much cheaper than explaining a preventable placement problem after the liner has been removed.
Repair-Yard Checklist Before Final Placement
Before the adhesive liner is peeled, confirm these points:
- The panel matches the boat area, drawing, photo reference, or location note.
- The liner is still intact and protecting the adhesive face.
- The deck or hatch surface has passed the yard's surface-readiness check.
- The panel has been dry-fit in position.
- Hatch, drain, hardware, edge, and seam decisions are approved.
- The work area is clean enough for exposed adhesive handling.
- Clean gloves and required tools are ready.
- The placement sequence is agreed before anyone starts peeling.
- A photo or checklist record captures the dry-fit approval.
- Removed liner scraps have a waste location away from the work surface.
This checklist is most valuable when it is used before the job becomes irreversible.
Related Reading for Repair-Yard Teams
If your team is still choosing or specifying backing, start with the Marine Deck Adhesive Backing Guide. It helps buyers separate backing requirements from installation assumptions before the order is placed.
For broader installation controls, pair this workflow with the EVA Marine Deck Installation Guide. Before any liner is peeled, the Boat Flooring Substrate Assessment Guide helps repair yards decide whether the surface is ready.
For panel-fit approval, use the Boat Flooring Dry-Fit Checklist. For hatch openings, drains, and hardware conflicts, the Boat Flooring Hatch and Hardware Cutout Guide gives a more detailed cutout-review workflow.
How XYF Marine Can Support the Review
When sending a boat flooring inquiry to XYF Marine, include the boat area, substrate notes, intended backing requirement if already known, panel drawings or photos, hatch and hardware concerns, and any repair-yard handling constraints. Clear pre-installation information helps both sides confirm what should be quoted, produced, packed, and reviewed before final placement.
FAQ
Should the adhesive liner be removed during dry-fit?
No. Dry-fit should normally happen with the liner intact so the panel can be checked without exposing the adhesive face. If a different method is required, follow the product-specific installation instruction rather than improvising on the deck.
What should a repair yard do if dust reaches the adhesive side?
Stop and assess the panel before placement. Do not hide the issue under the panel or try unsupported cleaning methods. Record what happened, check the supplier guidance, and decide whether the piece can still be used.
Is liner handling only an installer issue?
No. Project managers, receiving teams, and supervisors all affect liner handling. If panels are mislabeled, stored poorly, dry-fit late, or peeled before approval, the installer inherits a problem that started earlier in the workflow.