

Boat Flooring Hatch and Hardware Cutout Guide for Marine CNC Shops
Boat flooring projects often look simple until a hatch pull, drain, hinge, latch, speaker ring, inspection plate, or fuel-fill area needs a clean cutout. For a marine CNC shop, the difficult part is not only cutting the foam. The difficult part is knowing exactly which hardware must remain exposed, which items can be covered, where clearance is needed, and who approved the final interpretation before the router starts.
This guide gives CNC shops a practical workflow for managing hatch and hardware cutouts in boat flooring jobs. It is written for teams that receive customer photos, templates, CAD files, or marked-up drawings and need to turn those inputs into a controlled cutting packet. Use it as a communication checklist, not as a substitute for project-specific measurements or engineering review.
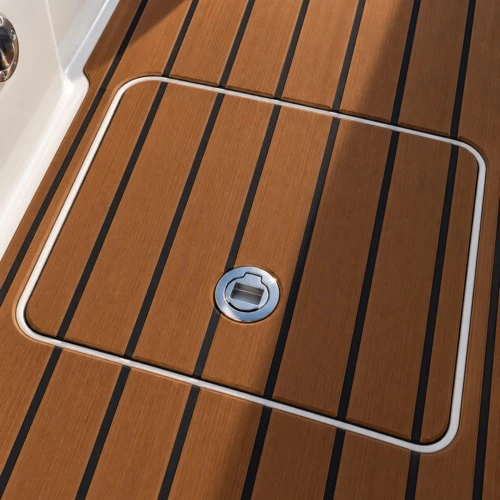
Why Hardware Cutouts Need Their Own Workflow
A general deck outline is only one layer of a boat flooring job. Hatches and hardware create many smaller decisions inside that outline. A hatch may need a reveal around the lid. A drain or round deck fitting may need a centered opening. Hinges and latches may need enough exposed space to operate. A removable panel may need a different edge strategy than a fixed floor area.
If these decisions are hidden inside casual messages, the CNC shop carries too much interpretation risk. One person may assume the foam should stop outside a hatch outline. Another may assume it should continue across the hatch lid with a separate cut line. A buyer may approve a drawing without noticing that a latch is covered. These are not just cutting issues. They are intake, documentation, and approval issues.
Start With a Hardware Inventory
Before nesting parts or releasing a cut file, create a hardware inventory for the deck area. The inventory does not need to be complicated, but it should name every visible item that affects the cut path.
Record hatches, hinges, latches, drains, inspection plates, cleats, seat bases, pedestal mounts, cup holders, rod holders, speaker rings, fuel-fill caps, console bases, and removable panels. For each item, note whether the flooring should go around it, under it, up to it, or across a removable lid. If the answer is unknown, mark it as an open question instead of guessing.
Separate Three Types of Cutouts
Most hatch and hardware work falls into three practical categories.
First are exposed hardware cutouts. These are openings where the hardware must remain visible and accessible after flooring is installed. Examples include round fittings, drains, latch plates, and inspection covers. The CNC file should identify these as required openings rather than decorative details.
Second are operating-clearance areas. These are places where hardware may not need a full cutout, but the flooring must not interfere with movement. Hinges, hatch lids, sliding panels, and removable access covers belong in this group. The shop should confirm the intended clearance rule with the buyer before cutting.
Third are visual alignment areas. These are locations where the flooring pattern, groove direction, or seam layout must look continuous across nearby panels. This matters around large hatches because the hatch lid can become a visible focal point. Pattern direction should be confirmed before cutting, especially when multiple panels meet around one hatch.
Ask for Measurement Notes That Match the Drawing
A CNC shop should not rely on a single measurement screenshot or one unlabeled sketch. Ask for measurement notes that match the drawing or template system being used.
Each hatch or hardware item should have a reference name. A simple code such as H1, H2, Drain A, or Console Base B is often enough. The same code should appear on photos, drawings, file names, and approval comments. This makes it easier to discuss issues without saying "the round thing near the front seat" or "the small hatch on the left."
When a customer sends a physical template, the same principle applies. Mark the template with the part name, top side, bow direction, and any hardware that sits near the edge. For digital drawings, keep the cutout notes in the same revision set as the deck outline, not in a separate message thread that can be lost later.
Confirm Pattern Direction Before Nesting
Hatch cutouts are not only about openings. They also affect visual flow. A teak-look or grooved foam pattern can look wrong if a hatch lid is cut with the pattern rotated against the surrounding deck. The error may not be obvious in a flat drawing, but it can be obvious once installed.
Before nesting, confirm the desired pattern direction for each zone. Use bow-to-stern, port-to-starboard, or another clear orientation phrase. Avoid vague instructions such as "same as photo" unless the photo is marked. If a hatch lid should align with the surrounding deck, state that directly in the job packet.
Build a Cutout Review Layer
One useful practice is to create a separate cutout review layer before the final production file is released. This layer can show deck outlines, hatch outlines, exposed hardware openings, clearance areas, and labels in a simplified view. The purpose is not to make the drawing prettier. The purpose is to make approval easier.
The review layer should answer five questions:
- What is being cut as a full opening?
- What is being left as visible hardware clearance?
- Which hatch lids are separate parts?
- Which pattern direction applies to each part?
- Which items are still waiting for buyer confirmation?
If the review layer creates new questions, that is a good result. Questions found before cutting are cheaper and calmer than questions found after a batch is routed.
Control Edge Decisions Around Hatches
Hatch areas can create several edge decisions. The flooring may need to stop before the hatch gap, follow the hatch lid as a separate panel, or bridge visually across the surrounding deck and lid. Each choice affects appearance, serviceability, and installation expectations.
Do not let the CNC operator become the person who decides this silently. The buyer, installer, or project owner should confirm the intended edge behavior. The CNC shop can help by presenting options in neutral language: stop outside the hatch frame, cut a separate hatch-lid panel, or keep the surrounding pattern visually aligned across the hatch area.
Label Parts So Installation Does Not Become a Puzzle
Cutout accuracy can still fail at installation if parts are not labeled clearly. A set of similar hatch pieces can be easy to mix up, especially when several panels share the same color and groove pattern.
Use labels that connect the physical part to the approved drawing. A practical label can include the deck zone, part number, bow direction, top side, and revision. Keep the label method compatible with the flooring surface and packaging process. If a label cannot stay on the part, place the same information on a bag, sleeve, or packing sheet.
The goal is simple: when the installer opens the package, the part identity should be obvious without comparing every piece against the whole drawing.
Add Hardware Notes to the Approval Record
The approval record should not only say that the drawing is approved. It should also state what was approved. For hatch and hardware cutouts, this means naming the revision, listing the open hardware decisions that were resolved, and recording any assumptions that remain.
A useful approval note might say that the buyer approved the hatch-lid panel layout, the round deck fitting cutout, the groove direction, and the label sequence for a specific drawing revision. If a hardware item was intentionally excluded from the cut file, record that too. Silence is a poor approval method.
When to Pause Before Cutting
Some issues should stop the job until they are clarified. Pause when photos conflict with drawings, when hardware is visible but unlabeled, when a hatch lid is shown in one file but missing in another, when pattern direction is unclear, or when a buyer asks for "standard clearance" without defining what that means for the specific job.
A Practical Pre-Cut Checklist
Before releasing a boat flooring hardware cutout job to CNC, confirm that the packet includes:
- A deck-zone map with each hatch and hardware item labeled.
- Photos that match the labels used in the drawing.
- A clear rule for exposed openings, clearance areas, and covered areas.
- Pattern direction notes for each visible zone.
- A revision number or date for the approved drawing.
- Part labels that match the final cutting file.
- A buyer approval note covering hardware and hatch decisions.
- A list of unresolved items, if any, that must be answered before cutting.
This checklist does not replace skill at the machine. It gives that skill clean inputs.
Related Reading for CNC Teams
If your team is still defining the broader project packet, start with the Marine Deck Drawing and Template Guide. For fit language around edges and openings, pair this page with the Marine Deck CNC Tolerance Guide.
Once the hardware notes are settled, the Boat Flooring CNC Job Pack Guide can help organize files and labels. For repeat cutting, use the Boat Flooring First-Article Approval Guide before the rest of the job is released.
How XYF Marine Can Support the Conversation
For custom boat flooring projects, send XYF Marine the deck drawings, photos, template notes, hatch and hardware labels, preferred pattern direction, and any approval constraints your team already uses. The more clearly the cutout decisions are documented, the easier it is to discuss whether the packet is ready for quoting, sampling, or production review.
FAQ
Should hardware cutouts be decided from photos alone?
Photos are useful, but they should be tied to labeled drawings or templates. A photo without a part label can create confusion when several hatches or fittings look similar.
What is the biggest cutout risk for CNC shops?
The biggest risk is usually unclear approval, not the cut path itself. If the buyer has not confirmed which hardware stays exposed, which hatch lids are separate, and which pattern direction is required, the shop may cut a technically clean part that does not match the intended use.